
How to Highlight a Web Page (and Keep Your Highlights)
Highlighting is the fastest way to read actively on the web: it marks what matters while you read, and it gives you something to come back to when the page is long gone from your browser history. The problem is that the web was never designed to remember your highlights — close the tab and they are gone. In this guide you will learn three practical ways to highlight a web page, why two of them quietly fail, and how to highlight any page in a way that actually sticks.
Three ways to highlight a web page
1. Built-in browser tools (quick, but they don't persist)
Every browser offers something that looks like highlighting. Chrome and Edge have Find in page (Ctrl/Cmd + F), which flashes matches in yellow — but the marks vanish the moment you close the panel. Reader modes and reading lists let you save an article, yet they strip the page down and don't let you mark up the live web. Printing a page to PDF and annotating the PDF works, but you end up managing a folder of flat documents instead of a living collection of notes, and you lose anything that isn't static text, like your place in a dashboard or a web app.
Built-in tools are fine for a one-second check. The moment your goal is research, studying, or reviewing — anything you will look at again — you need highlights that survive the tab.
2. A dedicated highlighter extension (recommended)
A highlighter extension stores your marks separately and re-applies them to the page every time you visit. You keep reading in the real page — same layout, same links — while your highlights and notes appear as a layer on top. That is exactly what Web Annotator does: it is a free Chrome and Edge extension for highlighting text, adding sticky notes and drawings, and organizing everything in a side panel.
How to highlight a web page with Web Annotator, step by step
Step 1: Install the extension
Open the Chrome Web Store listing (or the Edge Add-ons page) and click Add to Chrome. The extension runs entirely in your browser — no sign-up, no server account. Everything you highlight is stored locally on your machine.
Step 2: Select any text and save the highlight
Open the page you want to mark up — let's use the Wikipedia article on web annotation — and select a passage with your mouse, just like you would copy it. Then save the highlight:
- press Alt + S (the default shortcut, also available from the right-click menu), or
- use the floating toolbar that appears on annotated pages, or
- open the side panel and use its controls — the panel is where all your notes live.
The selected text gets a highlight the moment you save, and the extension quietly stores more than the text: it also captures a snapshot of the page, so you keep the exact context even if the site changes or goes offline later.
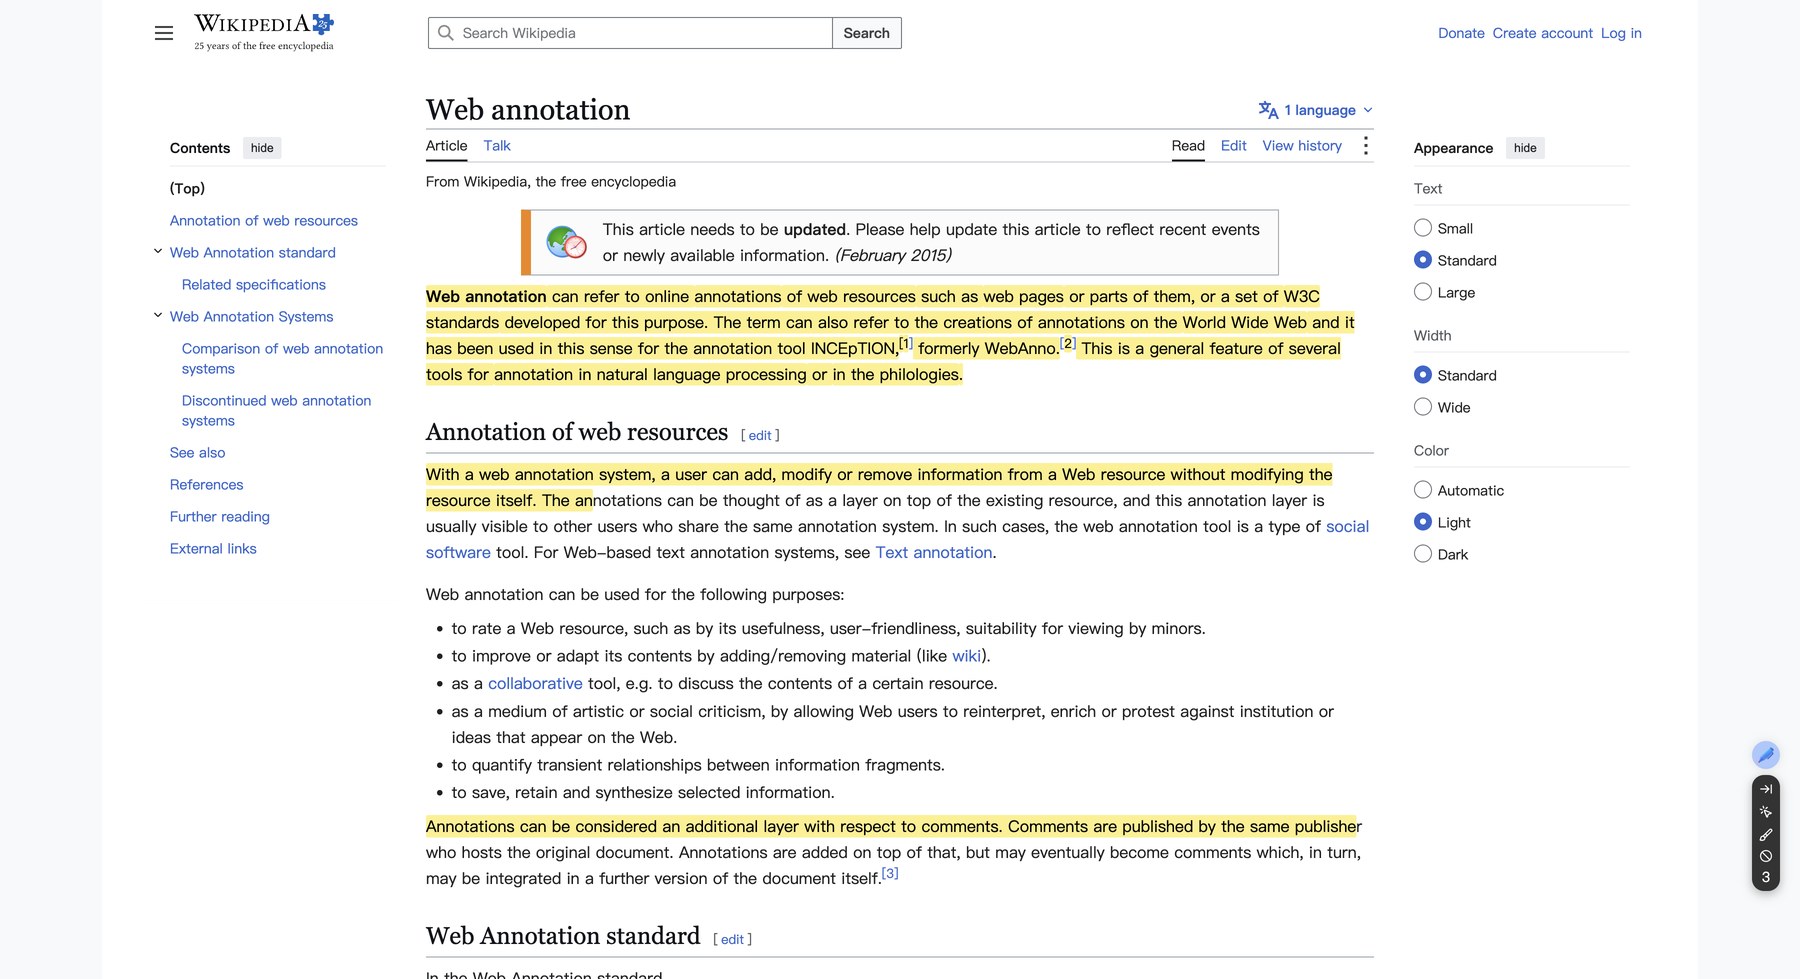
Step 3: Come back later — your highlights are still there
This is the part built-in tools can't do. Close the tab, reboot your machine, come back next week: when you open the same URL, Web Annotator recognizes the page and restores every highlight automatically. Because marks are matched to the page rather than painted onto it, they come back exactly where you left them.
Step 4: Manage everything in the notes side panel
Click the extension icon to open the side panel. Every highlight becomes a note card with the quoted text, the source URL, a timestamp, and a description field you can fill in with your own words. You can browse notes by path (this exact page), by domain (everything on this site), or view all notes across every website you have annotated.
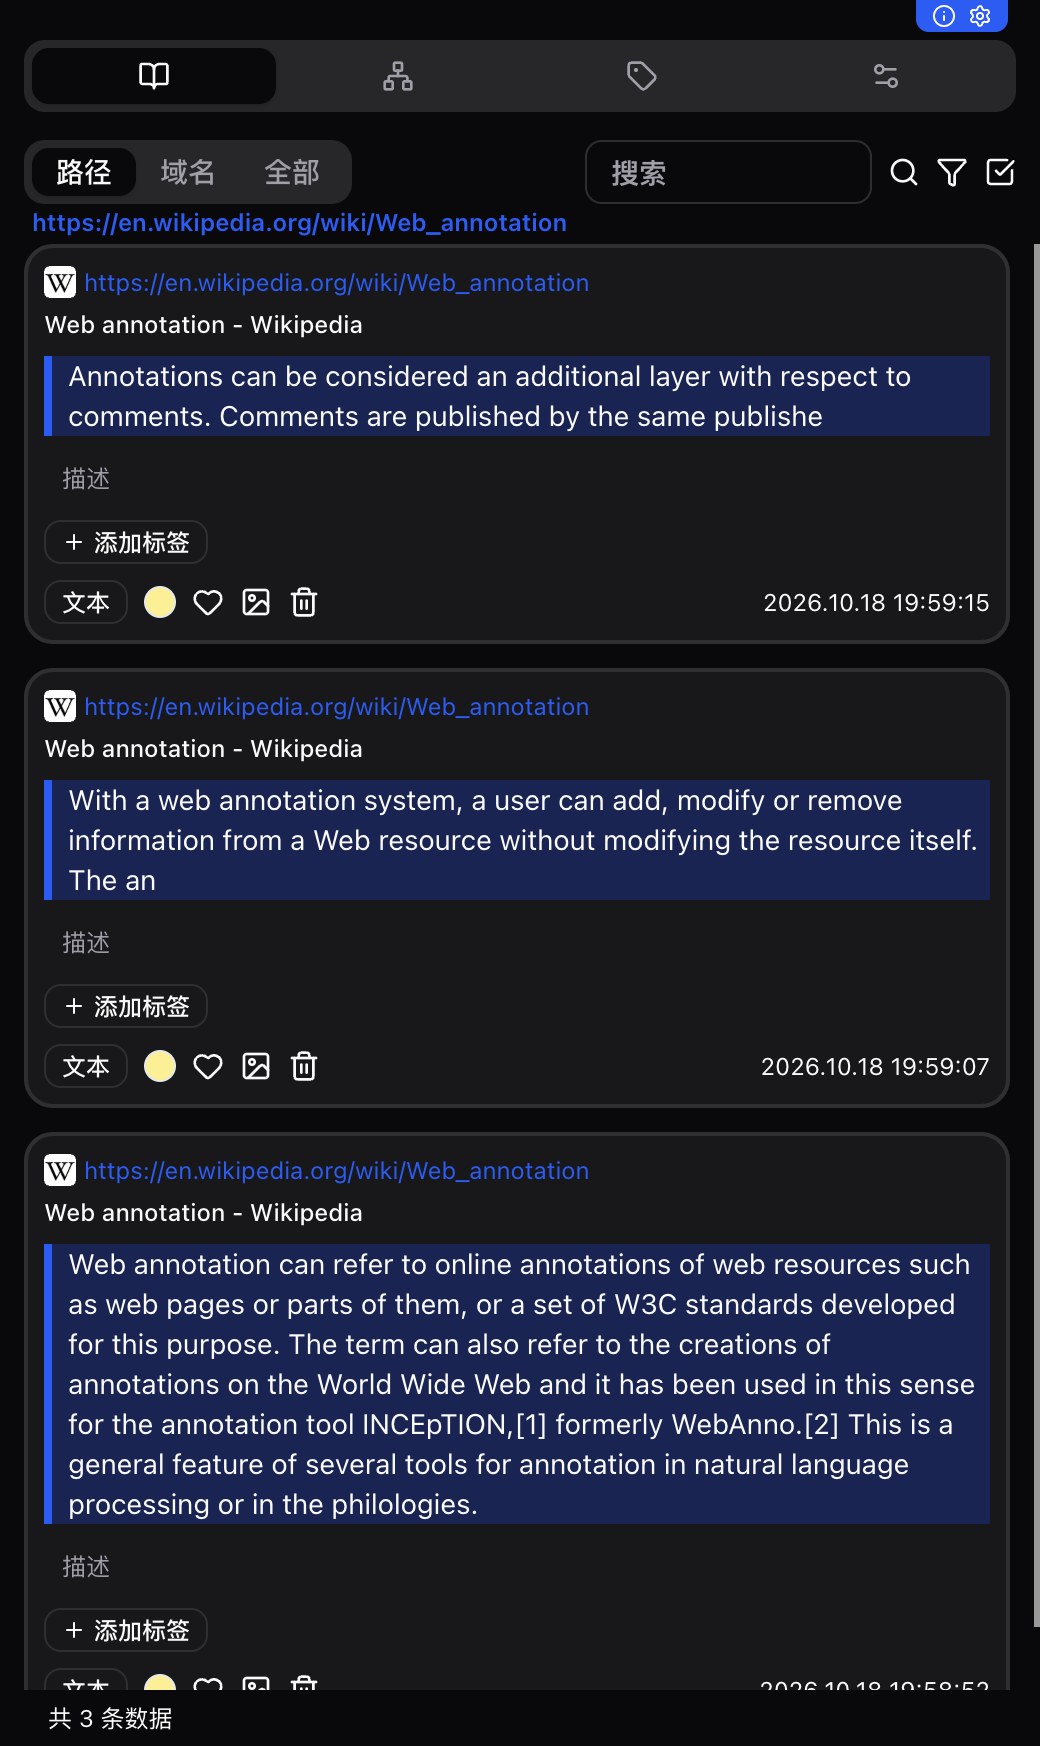
Step 5: Organize, export and sync
Notes are only useful if you can find them again. Web Annotator gives you a tree view grouped by website and path, custom tags and colors, and one-click export/import for backups. If you work across machines, optional WebDAV sync carries your notes to your other devices — or keep everything offline; both work.
Practical tips for highlighting the web
- Give colors a meaning. For example: yellow for key claims, green for numbers and data, blue for “read the cited source later”. A consistent system makes a hundred highlights scannable at a glance.
- Highlight less, but write a description. A one-line note about why a passage matters beats five glowing paragraphs when you revisit the page.
- Tag per project, not per page. Tags like
thesis-ch2orclient-x-researchlet you pull every relevant highlight from dozens of sites into one place. - Trust the snapshots. Pages change; your snapshot doesn't. For sources you will cite, that difference matters.
FAQ
Is Web Annotator free to use?
Yes. Web Annotator is a free browser extension for Chrome and Edge — highlighting, sticky notes, page snapshots, export and the side panel are all included without payment or an account.
Will my highlights still be there when I revisit a page?
Yes. Every highlight and note is saved automatically and restored the next time you open the same URL, even days or weeks later. Each note also keeps a snapshot of the page so the context is never lost.
Where is my data stored? Does it work offline?
Your annotations are stored locally in your browser with a privacy-first design — no account is required. You can back up or move your data at any time with one-click export/import or optional WebDAV sync.
Can I highlight on any website?
Web Annotator works on regular web pages, including news articles, documentation, blogs and web apps. Some restricted browser pages (like the Chrome Web Store itself or chrome:// settings pages) do not allow extensions to modify content.
Does highlighting work with keyboard shortcuts?
Yes. The default shortcut Alt+S saves a highlight of the selected text, Alt+A creates a sticky note, and Alt+D toggles the draw panel. Shortcuts can be changed anytime at chrome://extensions/shortcuts.
Start highlighting in one minute
Install Web Annotator, open any page, select a sentence and press Alt + S. That's the whole learning curve — the next step is simply reading the web the active way.